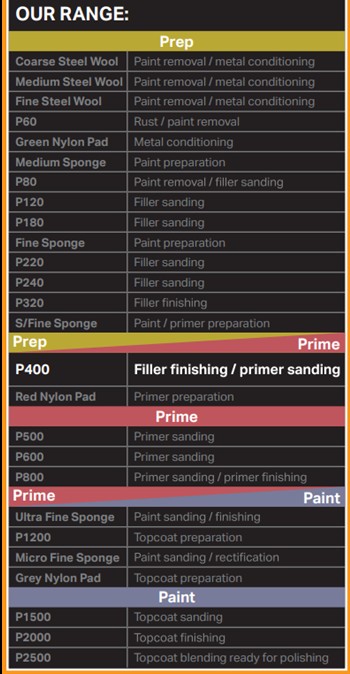
There are three distinct stages to surface and car body repairs and abrasives generally fall
under one of
these categories:
Preparation
The key to a successful job is preparation, and this stage is all about preparing a surface. For
example,
when completing car body repairs, you might need to start by using an abrasive to remove paint,
a scratch or
rust. Sometimes, filler will be required to restore a surface to its original shape, and this
will also need
preparing with an abrasive. At this stage, an abrasive with a larger mineral is required as
these provide a
deeper cut.
Directions of use: Try to work in a linear action and apply uniform pressure for best results
(this guidance
will vary depending on the product, so check the manufacturer’s instructions).
Prime
Once you’ve prepared the surface by getting rid of a scratch or paint, it’s time to prime the
area ready for
painting.
For most jobs like repairing car bodywork, multiple coats of primer need to be added to the
surface before
paint can be applied. An abrasive can then be used to smooth the primer ready for painting.
Directions of use: Work in a linear action and apply uniform pressure throughout the abrasive for
best
results (this will vary depending on the product, so check the manufacturer’s instructions).
Paint
The final stage for most surface and car body repairs is painting. Here, abrasives can be used
between coats
to smooth the surface or once all coats have been applied to help complete the job. This stage
is all about
smoothing the surface and only requires an abrasive with a smaller grain. Always follow the manufacturer’s instructions.

